Time-synchronization
| Introduction | This article is written for those interested in latency, especially those using the Wireless Endpoint or across multiple ByteBlower Servers. The quality of the latency measurements strongly depends on having a high-quality time reference. This is especially visible in the one-way latency measurements of ByteBlower server and Wireless Endpoint. Yet this tool provides invaluable information on network under test. With FrameBlasting you receive throughput and latency information for each direction and for each traffic-flow.
Yet measuring such latency values across distributed setups poses a particular challenge. To this end this text explains how to set up a qualitative time synchronization that solves these difficulties. |
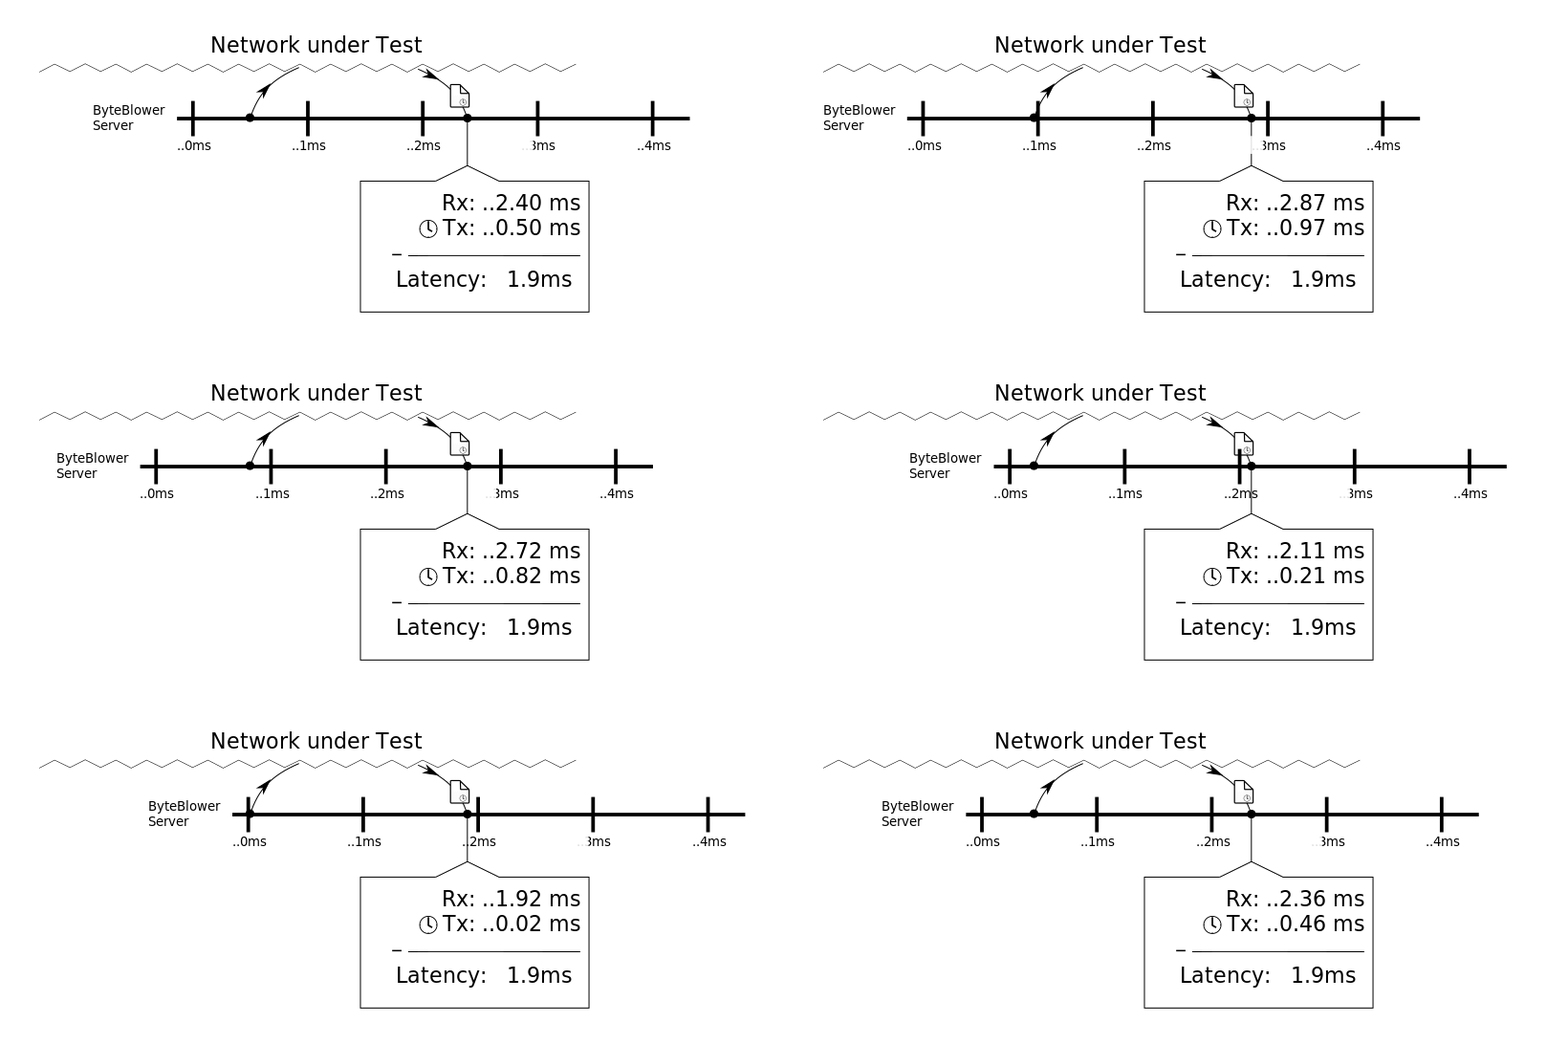
| Why time sync? | Latency of the traffic is the time-interval between transmitting the packet and next receiving somewhere else. Measuring this duration requires a sufficient fine timestamp to of each. In case of a single system, with a single clock, this calculation is straightforward. It is in shown in the picture below. The time-axis at the center represents the clock on the ByteBlower Server. The packet is transmitted at the left side of the figure, it passes through the “Network under Test” and is received further down the time-axis.
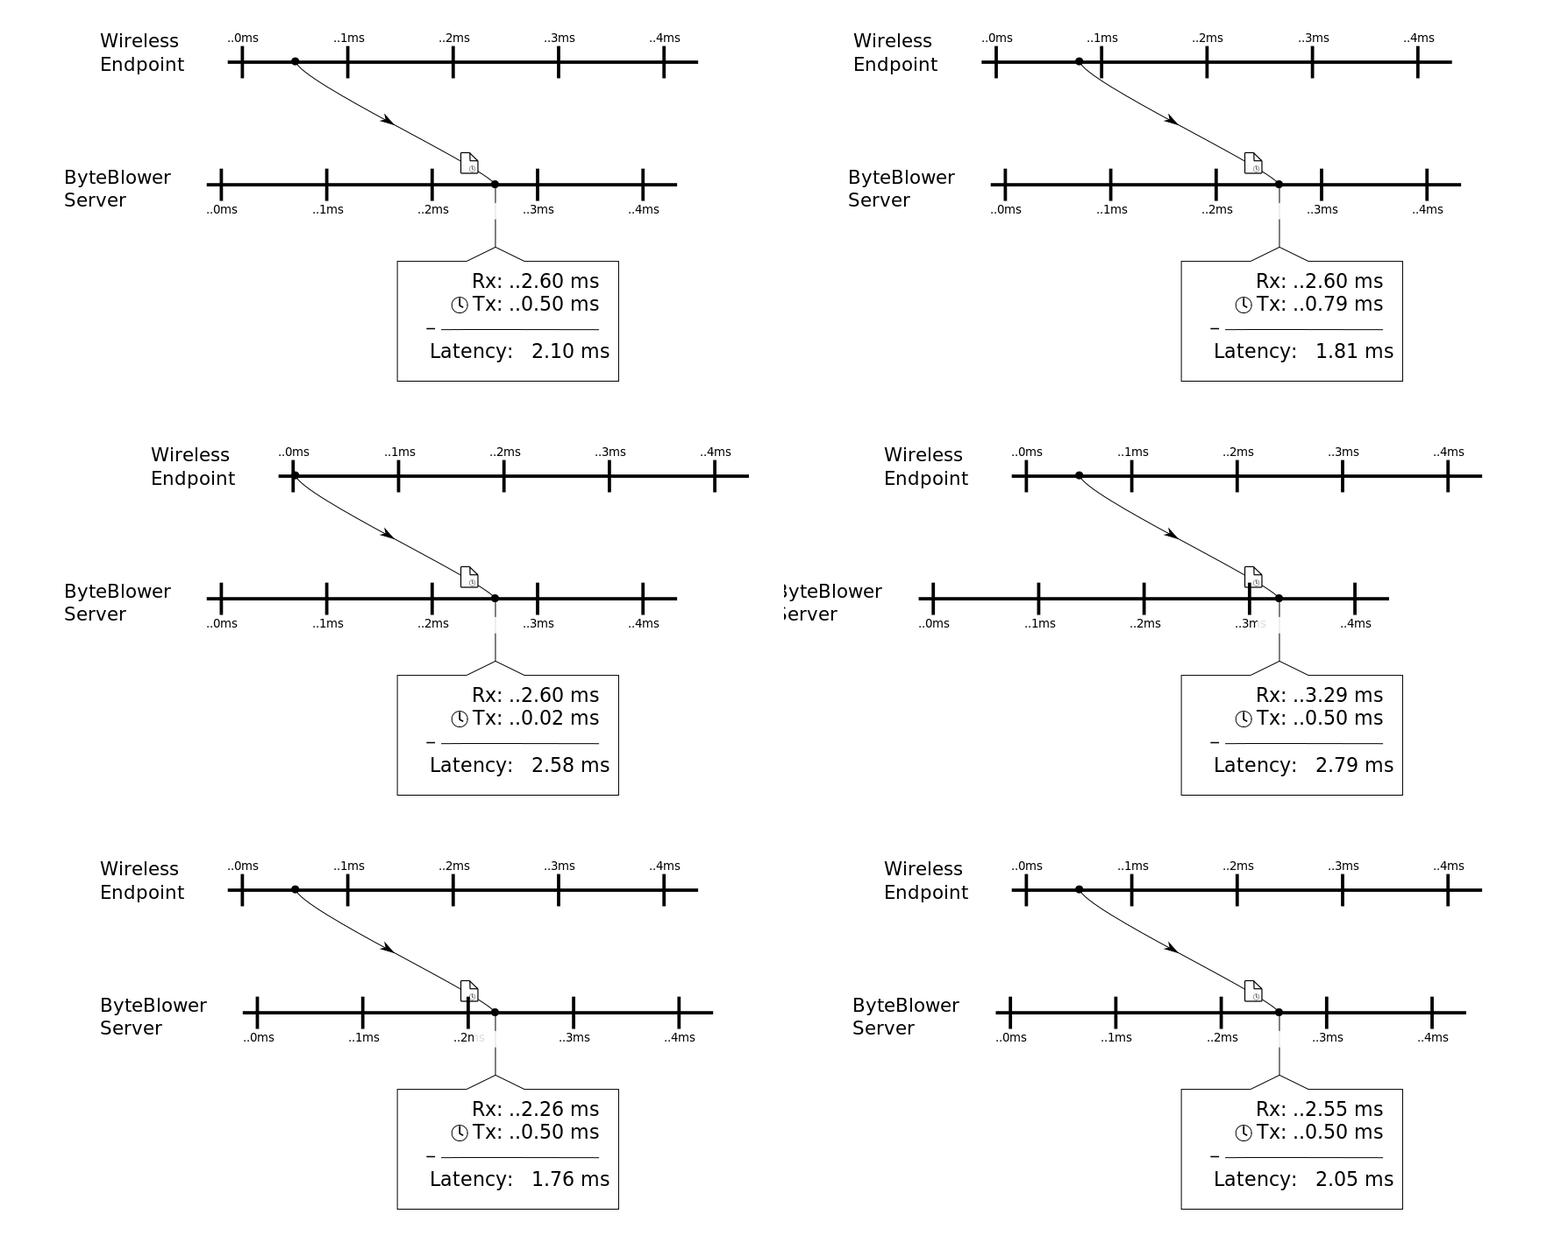
As can be seen above, although this calculation requires precise timestamps, any time-offset is unimportant. Such values are canceled out in the subtraction. This time-offset becomes important in case multiple systems are involved, e.g. a Wireless Endpoint and a ByteBlower Server. This situation is shown in the next situation.
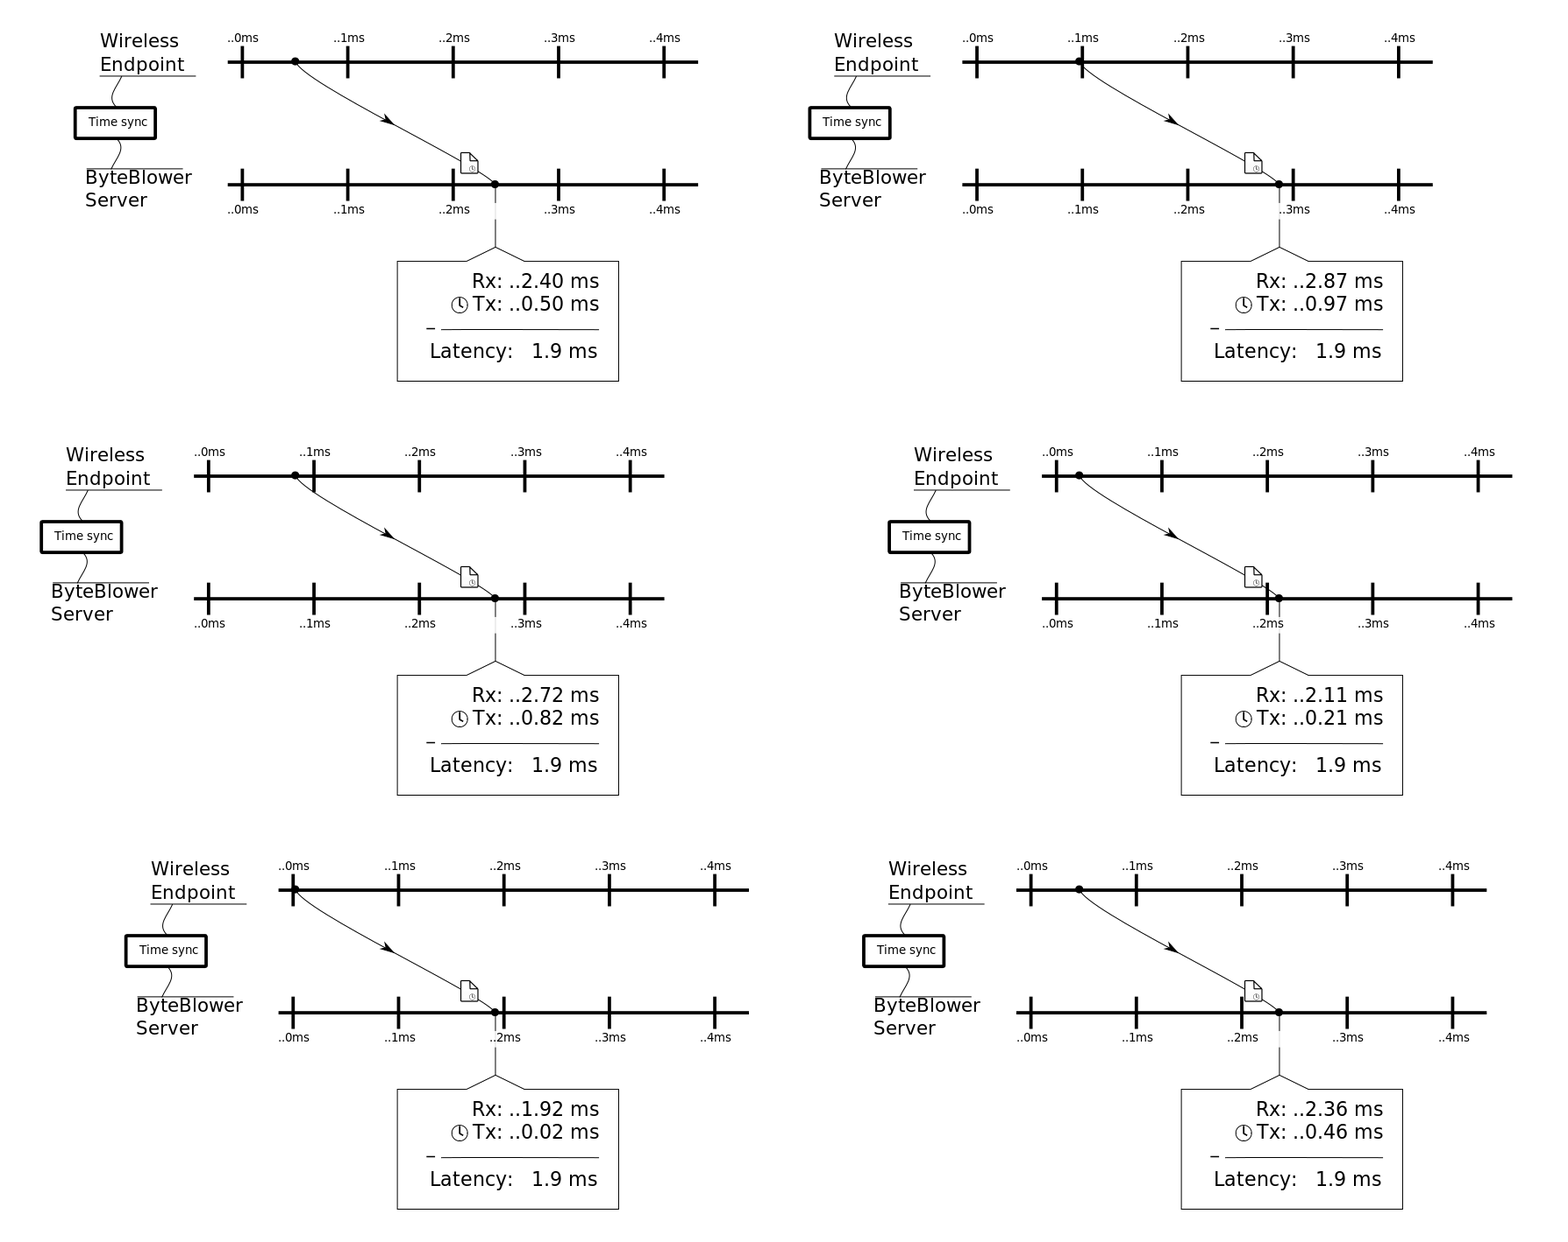
In the above case, the lack of time synchronization between the ByteBlower and Wireless Endpoint causes them to continuously drift compared to each other. These relative time-offsets have a large impact on the latency measurement, in some cases even resulting in negative latency values. This can be improved with time synchronization, its goal is to eliminate the drift between these different systems. In the figure below, a time references keeps both Wireless Endpoint and ByteBlower synchronized to each other. This is sufficient to fix the latency measurement issues.
|
| PTP | PTP, Precision Time Protocol is a time synchronization protocol intended for local networks. In this it complements NTP that offers time synchronization in wider networks, even the internet as whole. Furthermore, as an IEEE standard (IEEE 1588), PTP has considerable hardware support even in commercial-off-the-shelf hardware. These attributes make it the ideal protocol for the time synchronization required for accurate latency measurements.. In the next sections we’ll show how to achieve a time sync with offsets of mere microseconds. PTP is natively supported by the 4100 and 2100 series. It requires dedicated cabling, more information found in the following article. For the other models we recommend falling back to NTP. |
| Setup | In this section we will detail how to setup a new time sync master. Of course if you’re lab already provides PTP, then it does make sense to try using those first. The guide on the Intel NUC platform. These small barebones that are available for a modest prices. All steps were tested on the “Intel® NUC 11 Lite”. Even this lower-end model was sufficient for a proper time synchronization. This is the same Intel NUC as used for the Golden Client. In addition to the Intel NUC, many other systems will also serve well. In general following guidelines help you selecting
Step 1. Install the OS (Debian)Just like the Golden Client, Debian is chosen as base OS for the PTP master. This Linux distribution has considerable open source support and will stay relevant for the time being.
This PTP master does not require a desktop environment. If you’re comfortable with managing such a headless system, the desktop can be omitted. For Intel NUC platform both headless and desktop should work well, no large performance differences are expected. Step 2 PTP SoftwareAfter installing Debian, the PTP software is next. Linux has two leading PTP implementations: ptpd and LinuxPTP. This last one is the more recent one of the two. The software is available in the package manager. It can be installed as follows
The two following programs in this package are of importance:
Finally, the linuxPTP package contain also an third tool: Timemaster. This tool is intended for PTP SLAVE systems and not useful in setting up a MASTER instance. PTP ConfigurationOf the above two programs, only ptp4l needs a minimal configfile, mainly to specifiy the PTP domain number. On Debian, this file is stored at /etc/linuxptp/ptp4l.conf. Only the super-user (root) can make changes here. The PTP domain ensures that multiple PTP services can operate in parallel on the same LAN. Values up to 127 are possible, the example below uses the domain 5.
All systems joining the PTP sync should have the same domain number. This same number should be configured on the Golden Client and/or ByteBlower 4100 system. As mentioned earlier, default ptp4l first scans the network for other PTP MASTERs. This can be avoided with the following configuration.
Finally, when the system support its, also enable hardware timestamping in the configuration. This of course requires running phc2sys (shown next).
Running the PTP programsBoth ptp4l and phc2sys can run from the command-line. This is an easy way to get started with the setup. The list below shows how to run both.
Starting everything up at bootThe previous section started the programs from the command line. Including them in the startup of the system makes them more useful. On Debian, and many other linux distributions, this is done by Systemd.
[Unit]
Description=Master PTP server

[Service]
User=root
ExecStart=/usr/sbin/ptp4l -i enp2s0 -f /etc/linuxptp/ptp4l.conf
Restart=always

[Install]
WantedBy=multi-user.target
Finally, Systemd needs to be instructed to also enable the above services at startup. This is done with following commands: systemctl enable ptp_master.service Step3 Install NTP (optional)The above steps configure the PTP Master. This provides a most accurate time-synchronization for the local network but without a global time-reference the PTP-synchronized systems will still slowly drift away from the wall-clock time. Altough too small to have a significant impact on the latency measurements, it can make it hard to compare logs and timestamps. In addition, while PTP is perfect for the Golden Client and ByteBlower 4100 systems, the protocol is not yet supported on ByeBlower 5100, 3x00 and 1x00. These systems require NTP for time-synchronization. To minimize time-offsets between ByteBlower servers and Golden Client it helps to keep latency to the NTP server also to a minimum. Multiple NTP implementations are available; the steps below use Chrony. This is a more recent implementation that performs well compared to the others. Installing Chrony on Debian is easy:
Unlike the earlier mentioned PTP programs, on Debian this package will also configure Chrony to start at boot. The status is visible with the following command
To use Chrony also as NTP reference, the keyword allow should be added in /etc/chrony/chrony.conf. Like before, only the super-user (root) can modify these files.
|
| Verifying | To evaluate the time sync master, we recommend creating a small setup with minimal latency between the synchronized systems. Measuring the latency over this network provides lower-bound where further tests can be compared to. For example,
Trial testruns can be done with the ByteBlower GUI. As shown below, configure a latency flow in either direction.
Running the above configuration on the earlier described timesync master gives the results shown below. As can ben seen in both the tabular and the graphs, both ByteBlower 4100 servers never deviated farther than a couple microseconds. Such level of accuracy is sufficient for Wi-Fi, Docsis, (XS)GPON and 4G/5G testing.
|


